Wednesday, August 29, 2012

Simple Sillies 15-18 Months

Keep It Simple, Silly!

Here are some very simple ways I found to let my son explore his world from 15-18 months.


1)  Window clings.  $1 for loads of adjustable, removable fun.

2)  Add some food coloring to cool whip for cool fun.  This is perfect for the summer days in OK with 100+ degrees.

3)  Squishy paint pad.  This is a common idea (squirt paint in baggie and tape down).  But, instead of using a little bit of paint for drawing on, use more to make a squishy pad for walking on.  LM didn't understand using his hands but got a kick out of walking on it.


 4)  Balloon Corner!  I blew up 20 balloons during nap time and piled them in a corner.  Wow, did Little Man go wild for this!  Most of the balloons stayed inflated for close to 2 weeks.

5)  Window crayons.  They're non-toxic, washable and lots of fun.  My guy likes these better than regular crayons.  I pull out our bedroom mirror and we color.

6)  Sidewalk chalk.  This is a great age for sidewalk chalk.

7)  Pool noodles.  They cost $1 at the Dollar Tree, are made in America and are loved by toddlers.  I had no idea he would like them so much.  We both found fun ways to play.

Thursday, August 23, 2012

Crib Teething Guard

I suddenly found bite marks on the crib rail!  Yikes, I want this crib to last through all our kids ... and hopefully not be in shambles for the last one.  (Pipe dream?)

Anyhoo, a teething guard is now in order.  These are easy to make, but just in case you don't want to figure out the plans yourself, here is one way to make them.  :)
My crib has two rails in the front (just like the back), so my cover is a little taller than some might need.  The area I needed to cover is 51" long and 14" wide, measured from the bottom of one side of the lowest rail, over the top, to the bottom of the other side of the lowest rail.  (Make an upside down U.)  I made 4 sets of ties and they are about 6" long.  If you follow this pattern be sure to measure your crib and decide on the number of ties you want and where you want them.

Needs: 1 1/8 yard of a solid fabric and 5/8 yard of design fabric; 52"x15" fusible fleece - this will give the cover some dimension and softness. 

For the cover: Cut out four 18"x15" pieces from your solid fabric and two pieces from the design fabric. For patterned fabric, 18" needs to be along the horizontal side and 15" is the vertical side.
 
For the ties:  Cut out eight 2.5"x 7" rectangles of solid fabric.

Let's make the ties:


                    Iron them in half, lengthwise.


Sew a narrow seam around two edges.  I placed the edge of the fabric flush with the edge of the sewing foot.


Now trim the seam, especially around the corner.  You want to fold down the top of your tie a small bit and attach a safety pin through the bottom.

To turn the tie inside out:

1) Push the safety pin under the folded top.

2)Work the top over the safety pin.


3) Keep going until you have a little cocoon.
4) Use the blunt edge of a skewer to push
the pin as far into the tube as you can.
Really work it in.  You should get
almost all the way to the end.


5) Pull out the skewer.  Unfasten the pin by 
feeling through the fabric and pull it out.
6) Use your skewer to push out the edges
of the tie, focusing on the corners.


Ta-da!  One tie down.  After figuring out the first one, each tie takes about 5 minutes.  Iron your ties flat.
 
For the cover:
 
Pin the short sides of three pieces together, in order, with your design sandwiched between 2 solids. Pin them right sides together.   Remember, you're pinning the 15" sides to each other.
 
Sew a half-inch seam.  Trim and iron flat.  Do this for both sides of the cover.

Now cut out your fusible fleece to fit your cover from edge to edge.  Follow manufacturer's directions to iron the fleece in place.  (I ironed my bumpy side against the fabric. I layered the fleece, then the fabric and briefly ironed.)  I did not have 1 solid piece of fleece.  I had to use 3 and iron them in place separately.
Go to your crib and decide where you want your ties.  Measure the distance from the end. (I have ties at 10, 21, 32 and 43 inches from the beginning.)  Cribs have different size slats, so check yours! 
 
Flip the cover over, right side up.  Lay a measuring tape along the side of your cover and pin the ties in place.  Do this for both sides so that your ties will meet at exactly the same place.  Pin them about 1-1.5" below the edge to leave room for sewing.  Be sure your ties point inward!
 
Layer your second cover right side down, over this and pin in place.  Try to match up your seams.  Leave a sizable gap at one end to allow for turning the piece right side out.  I left about 5-6 inches.
 
Sew a half-inch seam.  Trim - especially around the corners so they will lie flat.  Leave longer edges on the side that didn't get sewn.  This makes sewing the topstitch less tricky.  Turn right side out.
 
Now use an iron to smooth.  Fold under the open edge and iron flat.  Pin again - use plenty of pins so your fabrics don't move - and sew a topstitch around the edge, sealing the opening shut.  I sewed about a half-inch in from the edge. 
 
 
All sewn up!  Place the guard over your crib and double knot the ties.  Stand back to enjoy your handiwork. 

 
This would be a great piece to do some fun quilting on.  Alas, I am not a quilter.  But this serves our purpose and coordinates beautifully in my little guy's dinosaur nursery.
 
Craft time: 4 hours
Cost: $4- fleece, $10-fabric (and it matches perfectly!)
 
PS:  I quickly made this one day after finding bite marks.  Looking online now, I see there are many tutorials for crib guards, so look around and find something that works for you. :)


Saturday, August 18, 2012

Fabric Covered Toy Box

When Little Man hit the 1-year mark I suddenly realized we had toys everywhere.  Anyone else have this problem?

Instead of buying a cheesy plastic container, I picked out some fun fabric and got to work!


These boxes are made from empty wipes and diapers cases.  Yay!  All you need: empty box, 1-1.5 yards fabric and decoupage glue.


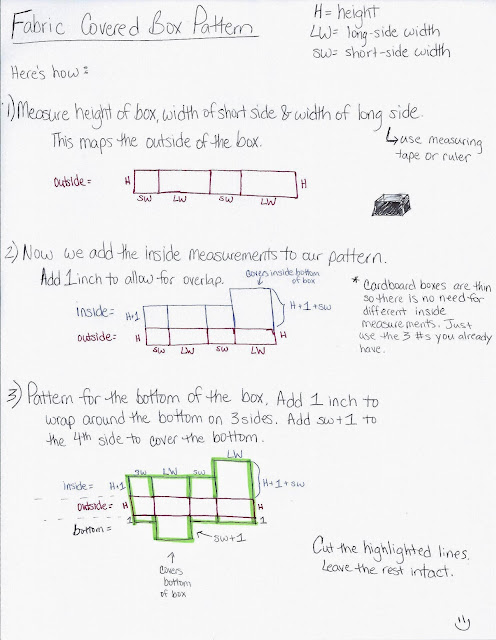
How much fabric do you need? Measure all the way around the outside of the box. This is the width you need. Measure across the bottom, up one side, down the inside and across the inside bottom plus an inch or two for overlap. This is the height of the piece you need. Pay attention to the direction of your pattern!! My piece was 43" wide and 32" tall.

So, grab a box that is your preferred size and cut off the flaps.  Save one of the short flaps.


Pause: This box was a very bright color and my fabric was a bit thin.  To help block out the colors, I found some white fabric in a local remnants section.  I cut out a strip long enough to wrap around the sides of the box. Use a sponge brush to add a good layer of decoupage to the box 1 side at a time.  Smooth the fabric over the sides, making a full circuit.  Use decoupage to overlap a half inch at the end.


Don't worry about the fabric overhang for now, just set it aside to dry. 

Now for the math, my favorite!  You need 3 measurements: the height of the box, the width of the short side and the width of the long side of the box.  Take those 3 numbers and plug them into this diagram.  It looks complicated, but it's not!!  Here it is step-by-step.  The highlighted lines are to be cut; the rest remain attached.


Whew! You have the pattern, now draw it onto the back of your fabric using a pencil and rulers.  2 rulers is very helpful for getting straight lines and square corners.  Don't fuss too much about perfection.  But pay attention to the direction of your pattern! 


Cut out your pattern.


Alright back to the box.  If you used a base fabric, trim the edges with scissors.  Don't worry too much about perfect evenness because your fabric will cover it.  You can still see through the white fabric but it should be enough to keep the colors from showing through the final fabric.


Wrap the dry fabric around the box just to make sure it looks right.   See, it's going to look great.  Almost done!
Begin applying decoupage to one side at a time.  Smooth, smooth, smooth the fabric as you go.  You do not want any bumps or creases.  You'll find that most fabric has a little stretch so if your pattern is slightly askew, no worries.  Keep your scissors handy in case you need to trim.


To finish off the bottom, decoupage and wrap the excess fabric from the 3 short sides.  Then decoupage the larger piece.  To make the edges look nicer you can fold them in slightly making a hem.  It's the bottom, so it's up to you how pretty you want it to look.


Pull out the box flap you saved and fit it into the bottom of the box where the gap is.  Use it to fill in space on the bottom so that the finished product will have a smooth bottom.  You can see I wrote all over mine.  Oh well, no one will see.


Now the 3 shorter pieces go in the inside. Short sides first then the longer side.


Decoupage the final inside piece.  You can fold under the edges to make a nice hem as shown.


I did not add a layer of decoupage over the entire box.  I think it makes a rough texture.  You can do that and then buff out the texture with very fine sandpaper, but I don't think it's necessary.

Add any embellishments to the outside that you like.  Or none at all!


Craft time: 4 hours
Cost: $9 on fabric - but there's a lot of leeway here.

Tuesday, August 14, 2012

Potato Head on Felt

A toy inspired by...a toy.  What fun!

This is really fun and easy to make.  To start:  any frame will do.  I went to Goodwill and found a new frame for $2.99.  Awesome!  Remove the glass and wrap felt around the cardboard backing.  I had to buy felt off the roll because the frame was 11.75 x 15.75 - weird.  This was a good size though, I wouldn't want it smaller, and the felt was less than $3.

Use hot glue to hold the felt to the back of the frame.  Trim as you want.  I knew I'd be hanging this or laying it flat, so I wasn't worried about neatness.  Felt sticks to felt, so this is the perfect background for a felt Potato Head.

Ta-da, a blank canvas!


Now just free-hand a potato, ha ha.  (This project is so fun to make.)  I drew half a potato so that my final potato would be symmetrical.  Place your pattern on the frame to judge how you like the size leaving room for shoes and hats, of course. 

Trace your pattern onto a folded piece of tan or brown felt.


Cut out your potato and you're halfway there.

The next step is the most fun.  Design some accessories!  It's impossible not to smile while making these.  I had so much fun.  I made up the patterns but you could possibly find hat/mustache/etc. clip art online to use as patterns.


Use various colors of felt to cut out your new accessories.  Remember, felt sticks to felt!  Hot glue pieces that need held together - hat layers, belts, etc.  Hot glue works beautifully on felt.  When playing the pieces will naturally stick to the potato.  Fun, fun!


I hope you enjoy this as much as I did.  Such a simple, silly toy. 

Craft time:  3 hours
Cost: $5 in felt, $3 frame
Play time:  Well, 5 minutes before I took it away, my little 17-mth-old is too young to really 'get' it.
Age:  I would guess 20 mths+